you get some tools like Xcode, Interface Builder, iPhone simulator, and many more. The first application is usually called "Hello World" but I have named my first app "Hello Universe" because a revolutionary device calls for a change of name.
Purpose of the "Hello Universe" app
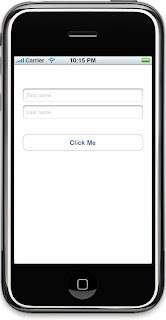
Using the app a user will be able to enter his/her full name and click a button to see a message appear. The message will say "John Doe says Hello Universe!!!". This app will not only introduce you to some of the tools but will also show you how to use controls, respond to events and create new views. Excited, I am :-)
This is how the app will look like
Creating a new project
Launch Xcode and click on File -> New Project -> Select Application (under iPhone OS) -> select Window-Based Application project template and click on choose.
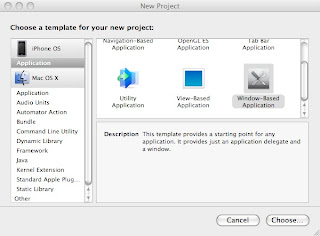
In the next screen you will be asked to save your project and give it a name. Xcode creates some files for us based on the name of the project, so you want to be careful with the name you provide. I have named my project "HelloUniverse".
This is how the list of files look like in Xcode.
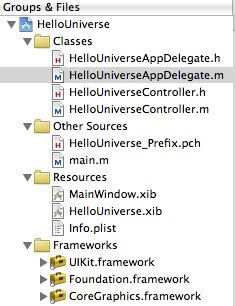
All the class files are stored under the "Classes" folder, some special files are listed under "Other Sources", all the view files and resources show up under "Resources", and any library or frameworks we add to our project are listed under the "Frameworks" folder. It is important that we save all the images, files, databases, and views in the "Resources" folder because all the iPhone apps run in its own sand box; which means they can only access files placed under the resources folder.
How the app is launched
Every C/C++/Java/C# programmer knows about the main method found in main.m file which is present under the "Other Sources" folder. You normally will never have to change this method and all we have to know is that this method is responsible in launching the app. The method applicationDidFinishLaunching method is called when the app is launched on the device or the simulator. The method is defined in "HelloUniverseAppDelegate.m" file which is found under the "Classes" folder.
Interface Builder
Using Interface Builder we can design our application by adding controls or creating additional views. The files that the Interface Builder creates gets saved with a .xib extension and are called nib files. Every project gets one nib file by called which is called "MainWindow.xib" which can be found under "Resources". An iPhone application has only one window (MainWindow.xib) unlike a desktop application which is created with multiple windows; however, we can create multiple views which are added to the window. Double click on "MainWindow.xib" to launch the Interface Builder, which will open four windows and one of the window will look like this
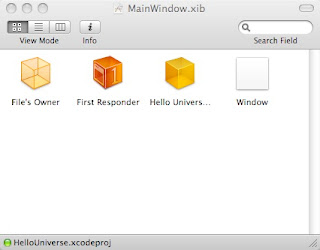
The above picture shows the contents of the "MainWindow.xib" nib file. Every nib file has atleast two files; File's Owner and First Responder which cannot be deleted. Every other objects apart from the first two, represents an instance of an object which gets created when the nib file loads. File's Owner simply shows that it owns the object in the nib file. First Responder tells us which object are we currently interacting with; like the textbox, buttons... The third object which is special to the MainWindow.xib file is called "Hello Universe App Delegate" and this file represents "HelloUniverseAppDelegate" class. Last but not the least the view represents the object which we design in our apps.
Creating a new view
If we had created this project using "View-Based Application" project template then there would have been no need of creating another view from scratch, but where is the fun in that. In Interface Builder create a new view by clicking File -> New -> Select Cocoa Touch -> View and click on choose. Let's save the view in the project folder by naming it "HelloUniverse" and once we do that IB (Interface Builder) will prompt us to add the view to the current project; click on "Add" and it will show up in Xcode. In Xcode and move your view to the Resources folder.
Creating a view controller
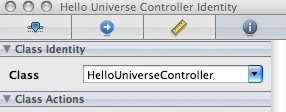
We have a view now let's create a view controller to manage the view. In Xcode create a new view controller by selecting classes and clicking File -> New File -> Select Cocoa Touch Classes under iPhone OS -> select UIViewController -> click on choose and name your file "HelloUniverseController" without changing the extension. The newly created class inherits from UIViewController which knows how to interact with a view. Now that we have our view and the controller class, there must be some way to connect these two files and we can do it by setting the class property of the File's Owner. Double click "HelloUniverse.xib" file in Xcode to launch Interface Builder and select File's Owner -> select Tools -> Identity Inspector and under "Class Identity" category, change the class to "HelloUniverseController". This is how the Class Identity should look like
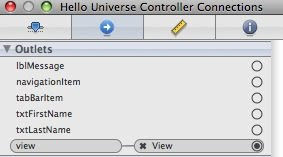
Once that is done we need a way to control the view in the nib file from code and this is done by connecting the view instance variable to the view object in the nib. The connection is made using "outlets". Select Tools -> Connections Inspector create a connection from the view variable to the view in the nib file. Move your mouse over the empty circle to see it change to a plus symbol indicating that a connection can be created. Click on circle and drag your mouse to the view in the nib file and release. As you do this you will see a blue line being created from the circle to the mouse. Once a connection is created, the connections inspector for File's Owner will look like this
Adding controls to the view
From the screen shot above we require two text boxes, one label, and a button (Round Rect Button). From the library drag and drop the controls to the view and align it as seen in the figure 1.0. After you have added the controls let's change some of its properties, starting with the text boxes. Select the first text box and open Attributes Inspector by selecting Tools -> Attributes Inspector. Under Placeholder enter "First name", under "Text Input Traits" change Capitalize property to "Words" and change the Return key property to "Done". Apply the same settings for the other text box but change the Placeholder to say "Last name". Select the label and delete its text property, since we do not want the label to say anything until the button is clicked. Double-click the button to edit the title of the button and type in "Click Me". Save and quit Interface Builder as we have successfully designed our view.
Connecting instance variables to the objects in the view
We still need some way to interact with the controls on the view, in code and this is where outlets help us out. IBOutlet is a special keyword if used with an instance variable, will make the variable appear in Interface Builder. Since IBOutlet makes the variable appear in Interface Builder, using IBAction as a return type for a method will have the opposite effect. Using IBAction we can handle an event triggered by any control placed on the view. Let's see how this works; open HelloUniverseController.h file in Xcode and type in the following code
//HelloUniverseController.h

@interface HelloUniverseController : UIViewController {


IBOutlet UITextField *txtFirstName;

IBOutlet UITextField *txtLastName;

IBOutlet UILabel *lblMessage;

}


- (IBAction) btnClickMe_Clicked:(id)sender;


@end


//HelloUniverseController.m

- (void)dealloc {

[txtFirstName release];

[txtLastName release];

[lblMessage release];

[super dealloc];

}
All the variables above are marked with IBOutlet and Interface Builder will make these available to itself so proper connections can be made. We also have a method whose return type is IBAction (void); Interface Builder will also make this method available to itself so we can choose which event will call this method. The method also takes a parameter called "sender" which is the object which triggered the event. The variables are released in the dealloc method as shown above. Let's connect these instance variables to the controls on the view (HelloUniverse) as described earlier. Open Interface Builder by double-clicking HelloUniverse.xib file and select File's Owner, open Connections Inspector to see all the variables present under Outlets and to create connections.

Let's hook up the button click event to the "btnClickMe_Clicked" method. Select the button and under the Events list it seems that we do not have a button click event; however, we do have a "Touch Up Inside" event which is raised when the button is touched and released symbolizing a click. With the button selected click the circle next to "Touch Up Inside" and drag your mouse over to File's Owner and release to have the method name show; simply click on the method name to create a connection.

Handling events
Let's write some code in btnClickMe_Clicked event to read the first and last name and display a message in the label. This is how the code looks like
//HelloUniverseController.m

- (IBAction) btnClickMe_Clicked:(id)sender {


NSString *FirstName = txtFirstName.text;

NSString *LastName = txtLastName.text;

NSString *Message = nil;


if([FirstName length] == 0 && [LastName length] == 0)

Message = [[NSString alloc] initWithFormat:@"Anonymous says Hello Universe!!!"];

else if ([FirstName length] > 0 && [LastName length] ==0)

Message = [[NSString alloc] initWithFormat:@"%@ says Hello Universe", FirstName];

else if ([FirstName length] == 0 && [LastName length] == 0)

Message = [[NSString alloc] initWithFormat:@"%@ says Hello Universe", LastName];

else

Message = [[NSString alloc] initWithFormat:@"%@ %@ says Hello Universe", FirstName, LastName];


lblMessage.text = Message;


//Release the object

[Message release];

}
The method does few simple things, it finds out the first and last names and figures out what message to display in the label. We also create a temporary variable called "Message" to hold the message which will be displayed in the label. The variable is allocated and initialized by alloc and initWithFormat messages respectively. The variable is released in the end because when working with the iPhone we are responsible of cleaning up the memory. The easiest way to remember when to release objects is; if you create it then you own the object and hence you are responsible of releasing it.
If you click on Build and Go, the view will not be visible because we have not yet added it to the window. Let's see how we can do that
Adding view to the window
Now we cannot drag the view and add it to the window, so we need another way to add the view as a sub view to the window. We already know that "HelloUniverseController" is the view controller of the view "HelloUniverse" and "HelloUniverseAppDelegate" is the application delegate where the window is made visible in applicationDidFinishLaunching method. It is in that method we will add the view as a sub view to the window. Before we do that, the application delegate (HelloUniverseAppDelegate) needs to know about our view controller. Add the following lines to HelloUniverseAppDelegate.h file to change the file like this
//HelloUniverseAppDelegate.h

@class HelloUniverseController;


@interface HelloUniverseAppDelegate : NSObject  {

UIWindow *window;

HelloUniverseController *hvController;

}


@property (nonatomic, retain) IBOutlet UIWindow *window;

@property (nonatomic, retain) HelloUniverseController *hvController;


@end
From the above code we first add a forward class declaration of "HelloUniverseController" because we do not want any circular dependency when we import the header file of "HelloUniverseController" in HelloUniverseAppDelegate.m. A variable and a property of type HelloUniverseController is also declared. The property as you can see is declared with a couple of attributes called "retain" and "nonatomic". The retain attribute will increase the reference count of the instance variable by one and nonatomic is used because our program is not multi-threaded.
A lot of first time users miss to synthesize the property we declared, so let's do that now at the top of the HelloUniverseAppDelegate.m file and the code looks like this
//HelloUniverseAppDelegate.m

@implementation HelloUniverseAppDelegate


@synthesize window, hvController;

...
The view is added as a subview to the window in applicationDidFinishLaunching method and this is how the code looks like
//HelloUniverseAppDelegate.m

- (void)applicationDidFinishLaunching:(UIApplication *)application {


HelloUniverseController *hvc = [[HelloUniverseController alloc]

initWithNibName:@"HelloUniverse" bundle:[NSBundle mainBundle]];


self.hvController = hvc;


[hvc release];


[window addSubview:[self.hvController view]];


// Override point for customization after application launch

[window makeKeyAndVisible];

}
The second line shows that we imported the header file of "HelloUniverseController" and we also synthesized the property hvController. In the "olden" days in order to create a property we had to create getter and setter methods which would be something like getHVController and setHVController. The synthesize keyword automatically generates these methods for us. In applicationDidFinishLaunching method we allocate and initialize a temporary variable, assign it to our property, release it, and the view associated with the view controller is added as a sub view to the window. The key thing to remember here is that the view message is passed to the "hvController" which returns the view and is added as sub view to the window. A valid view is returned because we created a connection from the view instance variable to the view in the nib file. The property is finally released in the dealloc method as shown below
//HelloUniverseAppDelegate.m

- (void)dealloc {

[hvController release];

[window release];

[super dealloc];

}
We have always allocated and initialized variables in one single line as seen below, this is usually the accepted way but the same code can be written in a different way as seen below
HelloUniverseController *hvc = [HelloUniverseController alloc];

hvc = [hvc initWithNibName:@"HelloUniverse" bundle:[NSBundle mainBundle]];
Build and go to test your application.
Hiding the keyboard
Wait a minute clicking the "Done" button doesn't do anything. Ideally we would like to hide the keyboard when the "Done" button is clicked no matter which text box we are currently editing. To hide the keyboard we need to do two things; set the delegate of the keyboard to File's Owner and implement a method called textFieldShouldReturn in HelloUniverseController.m file. To set the delegate, open Interface Builder by double clicking HelloUniverse.xib, select the first text box and click on Tools -> Connections Inspector. Click and drag your mouse by selecting the empty circle next to delegate under "Outlets" and release your mouse over to File's Owner. Assign the delegate for the next text box in the same manner.
The method textFieldShouldReturn gets called when the "Done" button is clicked and this is how the code looks like
//HelloUniverseController.m

- (BOOL)textFieldShouldReturn:(UITextField *)theTextField {


[theTextField resignFirstResponder];

return YES;

}
The method gets a parameter called sender, which is the object that triggered the event. We will use the same object to which we send the resignResponder message, which will hide the keyboard on the textbox. The boolean "Yes" is returned to tell the sender that the first responder is resigned.
Conclusion
I hope you had fun with this tutorial and feel a little confident in writing your next great iPhone app. Please leave me your comments and let me know what you thought.
Download the source code used in this article
0 comments:
Post a Comment
Thanks For Your Valuable Time.